Denis Zhigula, Intel Corporation
Version 0.1 December 15, 2005
Version history
|
Version and date |
By whom |
Changes |
|
0.0 October 24, 2005 |
Denis I. Zhigula |
Document created |
|
0.1 December 15, 2005 |
Denis I. Zhigula |
HTML translation |
|
0.2 January 22, 2008 |
Alexander Lukichev |
Major revision, changes to make the documentation up-to-date and consistent |
This document describes how to get started with the GPE Application Client in the version 1.5.2. We assume that you are familiar with the basic GPE concepts and have already started (or have access to) a GPE server. We are always looking for feedback so if you have any comments or bug reports or are just interested in our development please register at our bug tracking system at: http://sourceforge.net/projects/gpe4gtk
Application Client distribution is available as an installer application (jar). You should run it and fill in the usual installer wizard fields. After the installation process completes the Application Client can be found in the destination directories. The shortcuts may be also availbale at the desktop.
Before you are able to connect to the Grid systems you have to configure the security at the client side. This includes:
The client keystore is created automatically when the Application Client is invoked for the first time. The user is requested to enter the password to protect the newely created keystore.
In order to connect to grid services the client has to trust the remote parties. To achieve this the user should import the certificate of the CA that issued the certificates of the remote parties (the trusted CA certificate).
Click Settings/Setup Security. In the opened Keystore Editor window click Actions/Import certificate. Select the .pem file to import and click OK.
The certificate should appear in the Trusted Entries tab.
Click File/Save and close the Keystore Editor.
The user may generate the key pair and send the certificate request to the CA. The signed certificate may be imported and used (with the corresponding private key) for establishing the connection to the Grid systems.
Click Settings/Setup Security. In the opened Keystore Editor window click Actions/Generate certification request. Enter the name and the location of the file containing the request. Click OK. Click File/Save. The Keystore Editor may (but not required to) be closed.
The next step is to send the generated request to sign it. After you have received the signed certificate you must import it into the keystore: Actions/Import certificate. To check the correctness you can select the entry corresponding to the certificate (the tab Key Entries) and click Details button.
You should also set one of the key entries as the default one. Select one of the entries and click Set Default Alias.
This approach won't work with GPE4GTK grid however. In such case one has to have an entry at Virtual Organization Credential Service. See the next section for more details on configuring VO accounts in the Application Client. However if you have a certificate but not the account you may apply for the account at VOCS using the Keystore Editor. Click Actions/Put to VO Credential Service. Fill in the fields in the dialog window (VOCS URL, user name, the password to protect the record and the lifetime of the record) and click OK. After your request is confirmed you should add the VO account record information into the keystore. See the next section for more details.
The VO user account must exist before you try to use it from the client. See the previous section and Virtual Organization User Management section.
Click Settings/Setup Security. In the opened Keystore Editor window click Actions/New VO account. Enter the URL of the Virtual Organization Credential Service
(e.g. https://some.site.com:8443/wsrf/services/VirtualOrganizationCredentialService) and the VO user name. Click OK. The created record should appear in
the tab VO Accounts. Select it and click Set as Default. Click File/Save and close the Keystore editor.
After the security is configured you may configure other Grid parameters. Click Settings/Preferences. In the opened dialog window enter the URLs of the registry service and the GridBean service. Click OK. Click File/Get registries to refresh the list of the registries.
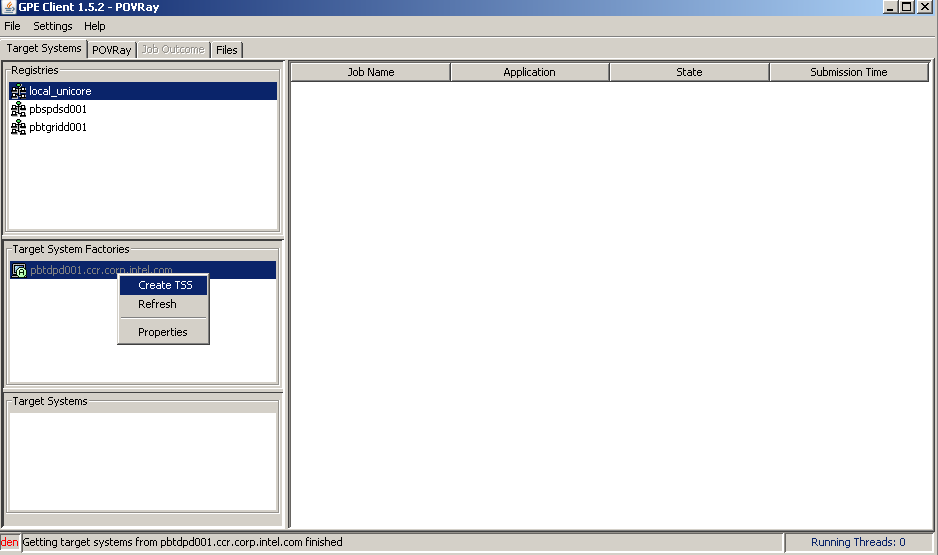
1. Click a registry to the display all target systems factories that have been created and registered at the registry.
2. Select a target system factory now.

3. Create TSS in the popup menu will create a target system with the factory. For GPE4GTK case the target system is preconfigured and it is not required to create a target system explicitly. However GPE4Unicore case requires explicit target system creation.


4. Select a target system from the list. The table in the right side of the window will contain the list of the jobs submitted by the user to the selected target system.
5. You are now ready to run your job on a target system. Download a GridBean from the GridBean service via the File/Download GridBean menu item. A list of available GridBeans those have been preconfigured at the GridBean service will be displayed. Select the GenericGridBean and press OK. The GridBean will be downloaded to your local file system into the preconfigured directory and automatically loaded into the Client. The second tab in the client window should now be titled Generic and display the user's interface of the loaded GridBean.
6. When the Generic GridBean has been successfully loaded you can submit a job to the target system you selected in the target system panel. To do this, you should edit the job parameters in the GridBean input panel. The Application combo box allows to select an application to run from the list of all applications those have been configured at the target system. E.g., select the DATE 1.0 application.

You may save the current job description at your local storage. Click File/Save job... and provide a destination filename to save the job description. You can also load a preconfigured job descrpition with File/Load job... .
7. Now go back to the Target systems panel, make sure that you selected the right target system. Submit the job by pressing File/Submit Job. Termination time dialog should appear. You should enter the initial lifetime interval of your job.

Press OK. Your job should appear as RUNNING in the list of jobs. To change the lifetime of the already submitted job select the job in the job list and click the right mouse button. Select Set termination time in the popup menu.
8. To refresh the job status select the job in the job list, click the right mouse button and click the Refresh item in the popup menu. The status of the job will eventually get SUCCSESSFUL (or FAILED).

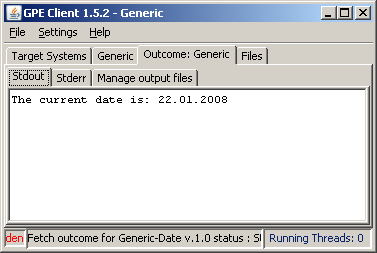
9. To fetch the outcome of the completed job, click the right mouse button and click the Fetch Outcome item in the popup menu. The client will fetch the outcome of the job and render it in the Job Outcome panel.

10. After you retrieved the outcome you can destroy the job. Select the job, click the right mouse button, click Destroy.
In a similar way you can execute all configured applications with the Generic GridBean. The GPE 1.5.2 release also contains POVRay GridBean for running POVRay application. This GridBean gives more advanced example of how GridBeans work.